Setting Up Your Arts Directory Account
How do I apply for the Arts Directory?
Visit the Join the Arts Directory page to learn more about the application process.
How do I access my Arts Directory account?
When application is approved, you will receive two emails: (1) a notification of your approval and (2) a Welcome email containing instructions on how to set the password for your Arts Directory account and how to log in. Please check your spam folders for these emails.
If you haven’t received the Welcome email within 12 hours of receiving your approval email, contact us.
How to Publish Your Arts Directory Listing
Prepare Your Content
To complete your Directory Listing, you will need to gather the following content:
- Featured Image: A horizontally oriented jpg or png of your work or another image that will represent your profile throughout the site. (72 dpi, recommended width between 600 and 1800 px)
- Bio/Organization Description: A biography in your preferred format:
- Text (up to 1200 characters)
- Video (one link to a video posted on YouTube or Vimeo)
- Images (up to three images with written descriptions)
- Audio (one link to an audio file posted on a publicly streamable service)
- Text (up to 1200 characters)
- Social Media Links: Please include the full URL/link to your accounts.
- Work Samples: Up to three samples of the work most representative of your work or the work of the entity being listed. At least one sample is required. Samples may be an image, a video link, or an audio link.
- Image or Link
- Title of Work
- Caption – a short description, such as specific details about the work
- Description – a space to discuss the work as needed, length not restricted.
Add Your Content to Your Listing
Visit your Dashboard to access and add content to your Directory Listing.
You may save your work and come back to it as needed. To view your Directory Listing, select the Preview button from the top navigation bar.
Use the tutorials below (coming soon) if you would like more detailed instructions.
Note: Editing Your Images
We recommend cropping, resizing (max width: 2400px) and compressing your images so they load properly on the site. There are many free and low-cost software options available for this, including:
Submit Your Listing
When you are satified with your Directory Listing, select the blue Submit For Review button. Your listing will be changed to Pending status.
Arts Foundation staff will review each listing prior to publication. After the site is out of beta (projected to be September 2022), Directory Listing review processing will take approximately two weeks.
Need More Information?
Review the screenshots and FAQs below. If your question isn’t answered here, please contact us!
Guidelines Table of Contents
Your Arts Directory Dashboard

A screenshot of the Dashboard you will see upon logging in to your Arts Directory account.
Sidebar Menu
1 - Dashboard
Select Dashboard to view your main Dashboard (pictured in screenshot).
2 - Directory
Select Directory to manage your Directory Listing. See below for a walkthrough of the Directory section.
3 - Revisions
Select Revisions to manage updates to your published Directory Listing(s) that you are working on.
4 - Profile
Select Profile in the sidebar menu to manage your account data, such as the email address you log in with.
5 - Manage Your Arts Directory Listing(s)
This links to the Directory page where you can view and manage your Directory Listing(s).
6 - View Your Revisions Queue
This links to the Revisions page where you can manage updates to your published Directory Listing(s), including editing working copies and submitting a change request.
7 - Arts Directory Guidelines and Tutorials
This links to the Guidelines page on the main Arts Foundation website (this page that you are currently reading).
8 - Arts Directory Terms of Use
This links to the Terms of Use page on the main Arts Foundation website that provides the terms and conditions for using the Arts Directory.
9 - Manage Your Account Details
This links to the Profiles page, where you can manage your account data, such as the email address you log in with.
10 - Recent Opportunities
Links to the most recent opportunities posted by the Arts Foundation.
Your Directory Listing(s)

A screenshot of the Directory section of the Arts Directory Dashboard.
1 - Featured Image
This is a thumbnail version of the Featured Image for your Directory Listing.
2 - Title
Select the Directory Listing title to open and edit your listing.
3 - Program Affiliations
Program Affiliations are displayed here for Directory Listings that are affiliated with a specific Arts Foundation program, such as a grant program or Open Studio Tours.
4 - Disciplines
The primary or top two Disciplines associated with this Directory Listing are displayed here.
5 - Metadata
This section contains provides information, such as the status of your Directory Listing, or the date your Directory Listing was last modified.

A close-up screenshot of the Directory section of your Dashboard.
1 - Featured Image
The Featured Image will serve as the primary image for your Directory Listing throughout the site. We recommend using an image of your work or of you at work, but you are welcome to use what you feel best represents you.
2 - Title
The Title area shows the current, public-facing Display name for your Directory Listing. It also will indicate if the listing is in Draft, Pending, or Has Revision status.
3 - Quick Edit menu
When you hover over the title of your Directory Listing, the Quick Edit menu will appear. The options available here will vary according to the status of your listing. When your Directory Listing is a Draft (see close-up screenshot), the Quick Edit menu consists of:
- Edit: Opens the listing editor screen (leads to the same page as selecting the title).
- Quick Edit: Opens a on-screen menu with limited options that can be done without opening the full editor.
- Preview: Opens a Preview of the current draft of the listing.
4 - Program Affiliations
Program Affiliations options are managed by Arts Foundation staff. If you are a participant in an Arts Foundation program, but it is not listed on your profile, please contact us to update your profile.
We will be adding Program Affiliations to Directory Listings submitted before August 20, 2022. Submissions received after that date will be eligible for Program Affiliations after the beta phase has ended, projected to be September 2022.
How do I update my Arts Directory listing?
Upon logging in, you can go directly to your Directory Listing editor by selecting “Manage Your Arts Directory Listing” in the Links area of your Dashboard, or click here to go to your listing. You can alternately go to the editing via the Directory area by selecting the Title of your Directory Listing.
Please fill out your listing as throughly as possible before submitting for publication.
Save your work by selecting Save Draft. When you are ready to submit your profile, select Publish, then Submit For Review. See below for aadditional details and screenshots.
Editing Your Directory Listing

A screenshot of the first part of the Directory Listing editor.
1 - Display Name
This is the primary Name/Title for your listing. It will be used publicly to designate this Directory Listing. This does not need to be a legal or registered name.
2 - Arts Directory Listing
This is the main Arts Directory Listing section, which consists of a few different subsections. Some Arts Foundation programs, such as the Open Studios Tour, will add additional sections for Directory Listings associated with those programs. You can open and collapse each section by toggling the arrow on the far right of the section title row.
Public Contact Details

1 - Public Contact Details
Enter your public contact information in this section. This information will be displayed publicly on your profile. This section is optional, you may fill out or leave these fields blank as your prefer.
2 - Public Contact Name
Enter the name you would like displayed on your Directory Listing as your primary contact name, which will display below your short bio. The name you put here will not affect the title of your Directory Listing.
3 - Preferred Pronouns
Enter your preferred pronouns in this field. They will display as you type them. If you do not wish to display your pronouns, you may leave this blank.
4 - Public Contact Email
Enter your public contact email in this field. This will display your email on your Directory Listing. We recommend you do not use your personal email address.
5 - Public Contact Phone
Enter your public contact phone number in this field. This will display your phone number on your Directory Listing. We recommend you do not use your personal phone number here.
Primary Details

A screenshot of the Directory Listing editor.
1 - Primary Details - Part I
The Primary Details section includes the basic details about your artistic work. The first two fields are the Short Introduction and the Primary Featured Image.
2 - Short Introduction
Enter up to 225 characters summarizing your art, your artistic vision, or simply your Directory Listing profile. This introduction will appear on the main header of your Directory Listing.
3 - Primary Featured Image
This is the primary image that will be associated with your Directory Listing. It will appear in the main header and in the background of your Directory Listing. It will also be the image used throughout the Arts Foundation site.
This image does not have to be a headshot. We recommend an image of your work that you feel best represents your artistic vision.
- Use a horizontal picture between 1600px and 1800px wide.
- Images should be 72dpi.
- Please compress your images before uploading. We recommend a free service such as tinypng.com.
- Name your image files before uploading. Best practice is to include the artist/organization name and the title of the artwork or a simple description of the image, i.e. ansel-adams-half-dome-1938.jpg or jean-michel-basquiat-untitled.jpg.
For instructions on uploading or editing your image, see below.
How Do I Upload a Featured Image?
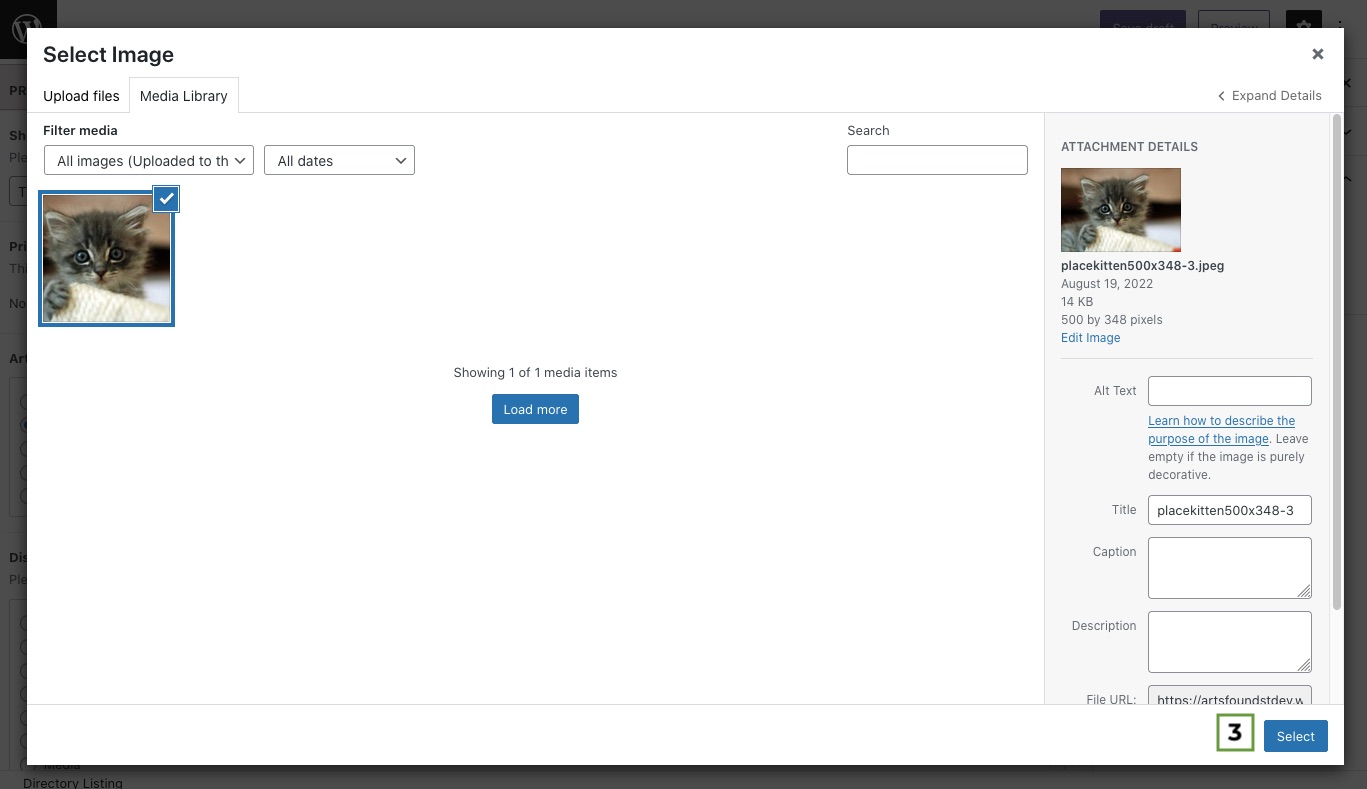
- Select the Add Image button. An upload module will appear.

- Select Upload Image and choose the relevant image from your files.
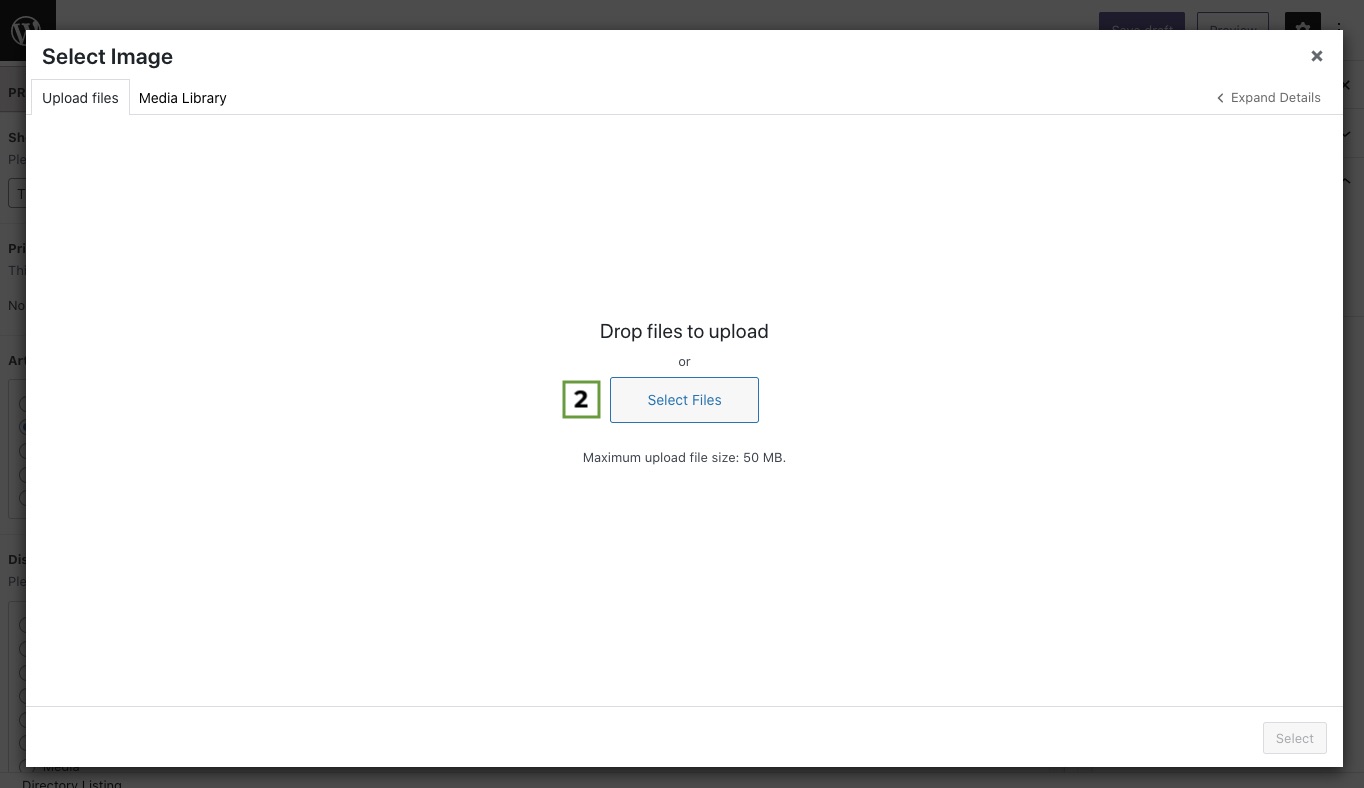
- After it has uploaded, select the blue Select button in the bottom right of the upload modules.
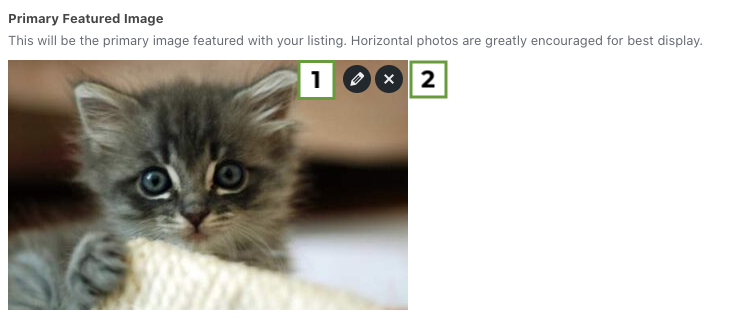
How do I Change the Featured Image on my Directory Listing?
You can edit or remove the current Featured Image on your Directory Listing by hovering over the image.
- Edit: Select the Pencil icon
- Remove: Select the “X”. Note: This removes your images from this field but does not delete your image from your account.
Note: Directory Listings must have a Featured Image. If you submit your listing without a Featured Image, your listing will be sent back for additional editing.

A screenshot of the Directory Listing editor.
1 - Primary Details - Part 2
The Primary Details section includes the basic details about your artistic work. The second part includes the fields for Listing Category, Primary Discipline, and Mediums.
2 - Listing Category
Select the Listing Category for this specific Directory Listing. Note: If there is more than one person, please select an option other than Individual.
3 - Discipline
Select the primary artistic discipline for this listing. You may select one option. Please contact us if your primary discipline is not represented here.
4 - Mediums
Select the mediums that you employ in your work. Please contact us if the medium(s) you work in are not represented here.
Biography

A screenshot of the Biography section of the Directory Listing editor.
1 - Biography
The Biography section includes information about the individual artist or information about the group or organization.
2 - Headshot/Logo
This image will be included in the Biography section of your Directory Listing. Upload a traditional headshot or portrait for artists, a group picture for collective or groups. A logo for a project, an organization, or a business is acceptable here.
3 - Bio/Description Format
Select the format that you would like to use for your biographical or organization description. You can select one format: text, video, images, or audio. The fields for your description will appear after you make your selection.
What image should I use for my headshot/bio image?
For your headshot bio image, we recommend using image that features you, your team or organization. You may use an organization logo for this image.
Please use a different image for your headshot/bio image than you do for your Featured Image.
Selecting a Biography/Description Format

Selecting the Text option for the bio/description.
1 - Text
To enter a text-based description, select Text.
2 - Enter Text
Enter your text-based biographical or organization description, up to 1200 characters.

Selecting the Video option for the bio/description.
1 - Video
To enter a video description, select Video.
2 - Enter URL
Enter the full URL (https://thelinkexample.com) to a publicly available video hosted on a third-party service such as YouTube or Vimeo. Do not use embed code; the video will automatically embed.
Note: We do not host videos on our servers, you must link to a third-party service.

Selecting the Images option for the bio/description.
1 - Images
To enter an image-based description, select Images
2 - Add to Gallery
Click the “Add to Gallery” button to upload up to three (3) images to represent your biographical or organization description. Each image must be captioned to be approved. Enter the caption when uploading the image.

Add a caption for each image you upload as part of your bio/description.
1 - Images Caption
Enter a caption for each of your bio/description images in the Caption field when uploading your image. Click on the image to reopen this setting screen.

Selecting the Audio option for the bio/description.
1 - Audio
To enter an audio description, select Audio.
2 - Enter URL
Enter the full link/URL (https://thelinkexample.com/the-file-name.mp3) to a publicly available audio track hosted on a third-party service such as Soundcloud. Do not use embed code; the track will automatically embed most services and hosted mp3 files.
Where to Find You

A screenshot of the Directory Listing editor.
1 - Where To Find You
The Where to Find You section is an opportunity to share links to digital accounts where interested folks may connect with you and explore your work.
2 - Website
Enter the full link/URL to your primary website for your artistic or cultural work.
3 - Social Media
Select the social media accounts that you use for your artistic or cultural work. The fields will appear when you select an option.
For all accounts, please include the full URL to your account.

A screenshot of the social media account options.
1 - Select the service
Select the accounts that you use for your artistic and cultural work.
2 - Your Account
Enter the full link/URL to your account. Do not enter just the account name or handle. For example, for Instagram, the full Arts Foundation account link would be http://instagram.com/artsfound.
Work Samples

The first part of Work Sample 1 in the Work Samples section.
1 - Work Samples
For the Work Samples section, please upload three separate examples of your work. These may be images, videos, or audio.
2 - Type of Work
Select the type of sample you will provide. Upon selecting a Type of Work options–image, video or audio–the additional content fields will appear.

1 - Image
Toggle Image to use an image as a Work Sample.
2 - Add Image
Select Add Image to open an upload module. Upload your selected image from your device.

1 - Video
Toggle Video to use a video as a Work Sample.
2 - Enter URL
Enter the full URL (https://thelinkexample.com) to a publicly available video hosted on a third-party service such as YouTube or Vimeo. Do not use embed code; the video will automatically embed.
Note: We do not host videos on our servers, you must link to a third-party service.

1 - Audio
Toggle Audio to use an audio clip as a Work Sample.
2 - Enter URL
Enter the full URL (https://thelinkexample.com) to a publicly available audio clip hosted on a third-party service, such as Soundcloud. Do not use embed code; the audio will automatically embed.
Note: We do not host audio files on our servers, you must link to a third-party service.

1 - Title of Work
Enter a title for this work sample. If the piece has no title, write Untitled. Your work sample will not display without an entry in this field.
2 - Caption
Enter a short caption for this work sample.
3 - Description
Enter a description of this work sample, such as an artist statement or a description of your process.
How many work samples do I need?
You must submit three work samples for each listing.
What if my work samples are from different disciplines?
You may include work from different disciplines. If your work is very disparate, consider creating a second Directory Listing to distinguish between your projects.
Saving and Publishing Your Listing

A close-up screenshot of the Publish box on the Directory Listing editing screen.
1 - Submit options
Use these buttons at the top of the Directory Listing edtior screen to save, preview, and submit your work.
2 - Save Draft
Select this button to save your work as you go.
3 - Preview
Select this button to view a preview of your Directory Listing.
4 - Publish
Select Publish to submit your new Directory Listing for review by Arts Foundation staff. A pre-publish check screen will display to confirm your selection.
How do I save my work?
Save your work by selecting the Save Draft button in the Publish box.
In Desktop view, the Publish Box will be top right corner of the page. On mobile devices, it will be below the profile fields
How do I submit my work for review?
Once you have completed your Directory Listing to your satisfaction, please select the Submit for Review button in the Publish box.
In Desktop view, the Publish Box will be top right corner of the page. On mobile devices, it will be below the content fields.
Once your submit your listing it will be marked as Pending. Until we publish it, you are able to edit the content as needed. Be sure to resubmit your Directory Listing when you have finished editing it.
Revising/Updating Your Published Listing
You can edit and update your Directory Listing after it is published. Through your Arts Directory account, create a Working Copy of your listing, revise it as necessary, and submit it for review and publication.
Create a Working Copy

A close-up screenshot of the Directory section of your Dashboard.
1 - Select Title
Hover over the title of the Diectory Listing you want to edit.
2 - Create Working Copy
To begin the Revision process, select “Create Working Copy” to create a revision draft of your listing. You will be taken to the editing screen of your new Working Copy.
Edit your Working Copy

A close-up screenshot of the Publish box on the Directory Listing editing screen.
1 - Save your Working Copy drafts
You can save drafts of your Working Copy as needed.
2 - Preview
Select Preview to view how the changes will look once published. You can also submit your changes on the Revisions Preview page.
3 - Submit a Change Request
When you have completed your revisions, click Submit a Change Request. Note: The button will disapppear once the request is logged.
You can continue to make changes and save draft of your Working Copy after submitting a Change Request. However, your Change Request may be approved at any time, so this is not recommended for extensive changes.
Preview Your Working Copy

A close-up screenshot of the Preview Options from the editing screen of your Working Copy.
1 - Preview size
Select the screensize you want to view as a Preview.
2 - Preview in New Tab
Open the current draft as a Preview in a new tab. This will open the Preview Screen displayed below.
2 - View/Submit Saved Revision
This will automatically submit the current version of your Working Copy. It will also take you to the Preview page for your Working Copy.

A screenshot of the options presented on the Revision Preview screen.
1 - Revision Status
This indicates if this revisions is a Working Copy or has been submitted as a Change Request.
2 - View Queue
Returns you to the Revisions page in the Dashboard where you can view a list of your Working Copies and Change Requests
3 - Compare
The Compare feature will allow you to view the differences in content between the published post and your revision.
4 - View Published Post
This button will take you to the currently published post.
5 - Edit
Click Edit to return to the revisions editor and continue editing your current revision.
6 - Submit
Click Submit to submit your revision as a Change Request. Staff will be notified and your revisions will be reviewed for publication.